
BYO modems

When connecting to the nbn, we recommend that you use a Dodo modem*, however you can use your own modem so long as it’s compatible with the nbn technology available at your address, and not locked to another provider.

*Our technical support team are fully trained on Dodo branded hardware, however we can only offer limited support for non-Dodo devices, depending on the age, make and model of your device. 


The following modems are incompatible with Dodo nbn®:

  • Foxtel Hub 1 and Foxtel Hub 2
  • Optus Nokia FastMile 5G Gateway v1/v2/v3
  • Vodafone Wi-Fi Cube 3
  • Telstra 5G Home Modem
  • TPG HG659

If you are using any of these modems you can find info on buying a Dodo modem here, or you try a different device.


Depending on your nbn connection type, your modem will need a ‘DSL’ port, or a ‘WAN’ port, if your modem has both of these, you should be able to use it.

FTTN (Fibre to the Node) and FTTB (Fibre to the Basement) both require a ‘DSL’ port, other technology types use a ‘WAN’ port.

Ports

If you’re unsure of your nbn technology type, you can find it in your Dodo welcome email, if you are still unsure you can log a request using My Dodo.


Connection help

  1. Identify your technology type (you can find this on your welcome email)
  2. Ensure that your cables are connected properly using our connection guides found here as an example
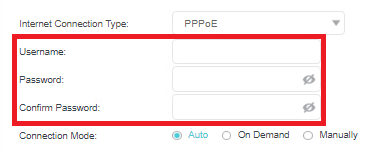
  3. Log into your modem and use the settings below
    • Connection type: PPPoE
    • Username: "email address used on signup"
    • Password: dodointernet
    • VLAN: Not required/NA

If you are still having issues connecting to the internet you can chat with our technical support team here or you can view our troubleshooting guides found here.

Related

nbn® branded hardware

Basic overview

Depending on your connection type, your BYO modem should have the below attributes in order to work with Dodo nbn®.

  • NBN compatible and compliant.
  • Capable of reaching your nbn plan speed
  • PPPoE complaint (Point-to-Point Protocol over Ethernet)
  • Ethernet WAN compatible (not required for FTTN or FTTB connections)
  • Support VDSL2 connections and SOS/ROC (Applicable to FTTN or FTTB connections only)

Using a modem from another internet service provider

Dodo nbn® is built for plug and play simplicity. In most cases you may need to power cycle your hardware once your Dodo nbn™ connection has been activated. 

Telstra modems

  • Most are compatible with Dodo nbn® and should only require a reboot.

Optus modems

  • Optus modems are locked to the Optus network and will not work with Dodo nbn®.
  • We recommend that you purchase a Dodo nbn® modem, as these are setup to be configured remotely and we can offer end to end technical support.
  • Contact us to purchase your Dodo nbn® modem.

iiNet modems

  • Most are compatible with Dodo nbn® and should only require a reboot.

Belong modems

  • The Belong 4315 modem is compatible but requires some changes to the device configuration.
  • We have a step by step setup guide found here.

TPG modems

  • TPG archer VR1600 modems are compatible with Dodo nbn® but require some changes to the device configuration.
  • We have a step by step setup guide for FTTN and FTTN connections found here, and guides for FTTP, HFC and Fixed Wirelesss connections found here.

Vodafone modems

Internode modems

  • Most are compatible with Dodo nbn® and should only require a reboot. (I'm guessing)

Store bought modem compatibility

Most newer model nbn® ready modems should work with dodo nbn®, in some cases you may need to make a change to your modems configuration. Please contact your modem manufacturer for assistance.

It’s never too late to purchase a Dodo modem, just contact us here and we’ll process the purchase and send you a new Dodo modem.


Related

How do I setup my Dodo modem?

To use your Vodafone Wi-Fi Hub™ modem, simply follow the steps below, and you should be connected to Dodo nbn in no time.


Step 1

Ensure that your modem is powered on and all wiring has been connected correctly.


Step 2

Using a paper clip press the modem’s reset button for about 10 seconds.

The reset button is located on back of modem as shown below.

Voda1


Step 3

Next you'll need to login to your modem, using a web browser type in this IP address 192.168.1.1 and press enter.

Voda2


Step 4

When prompted, enter your modem login details.

These can be found at the bottom of the product sticker on your device.


Voda3


Step 5

Once you have logged into your modem select "Settings" from the menu bar.

Voda4


Then select "WAN" from the menu on the left hand side

Voda5


Step 6

Next you need to change the connection settings.

Click the appropriate edit button, based on your nbn technology type*

  • WAN VDSL for FTTN or FTTB connections

  • ETHERNET WAN for FTTP, FTTC, HFC or Fixed Wireless connections 


Voda6


*If you’re unsure of your nbn technology type, you can find it in your Dodo welcome email, or you can click here to check what’s available at your address


Step 7

From the drop down menu, change the Connection Type from IPoE to PPPoE.

Voda9


Step 8

Scroll down to the Username and Password section.

Change the username to: "your email address used on signup"

Change the password to: dodointernet

Change the Service Name to: Dodo BYO

Voda10


Step 9

Scroll down, and press Save.

Voda8


Step 10

Scroll down and press Apply.

Voda9


Your modem should now be online and connected to your nbn service.

If you are still having issues connecting to the internet you can chat our technical support team here or you can view our troubleshooting guides found here.

To use your Vodafone Wi-Fi Hub™ 2.0 modem, simply follow the steps below, and you should be connected to Dodo nbn in no time.

Step 1

Ensure that your modem is powered on and all wiring has been connected correctly.


Step 2

Using a paper clip press the modem’s reset button for about 10 seconds.

The reset button is located on back of modem as shown below.

Voda2.0-1


Step 3

Next you'll need to login to your modem, using a web browser type in this IP address 192.168.1.1 and press enter.

Voda2


Step 4

When prompted, enter your modem login details.

Voda3


These can be found at the bottom of the product sticker on your device.

Voda2.0-2


Step 5

Once you have logged into your modem select "Advance Setup" from the menu bar.

Then select "WAN Service" from the menu.

Voda2.0-3


Step 6

Next you need to update the connection settings.

Click "Add" button.

Voda2.0-4


Step 7

From the drop down menu, select the change the Connection Type from IPoE to PPPoE.

voda2-6


Select the the option that matches your nbn technology type*:

  • "ptm" for FTTN or FTTB

  • "eth" for FTTC, FTTP, HFC or Fixed Wireless

*If you’re unsure of your nbn technology type, you can find it in your Dodo welcome email, or you can click here to check what’s available at your address.


Step 8

Under WAN Service Configuration, select PPP (it should be selected by default).

Then press "Next".

voda2-7


Step 9

Fill in the PPP Username and Password details:

  • Change the PPP username to: "email address used on signup"
  • Change the PPP password to: dodointernet
  • Change the PPPoE Service Name to: Dodo BYO
  • Then press "Next"

voda2-8


Step 10

You will then see the Routing -- Default Gateway screen, just press "Next" to continue.

Voda2.0-5


Step 11

Next you'll see the DNS Server Configuration screen, just press "Next" to continue.

Voda2.0-5


Step 12

You'll now see the WAN Setup - Summary screen, click "Apply/Save"

voda2-10


Your modem should now be online and connected to your nbn service.

If you are still having issues connecting to the internet you can chat our technical support team here or you can view our troubleshooting guides found here.

To use your Belong 4315  modem, simply follow the steps below, and you should be connected to Dodo nbn in no time

Step 1

Ensure that your modem is powered on and all wiring has been connected correctly


Step 2

Using a paper clip press the modem’s reset button for about 10 seconds

The reset button is located on back of modem as shown below

B1


Step 3

Next you'll need to login to your modem, using a web browser type in this IP address 10.0.0.138 and press enter

B2


Step 4

When prompted, enter your modem login details

Belong3


These can be found at the bottom of the product sticker on your device

B4


Step 5

Once you have logged into your modem select "Internet Connection" from the menu on the left

B5


Step 6

Fill in the PPP Username and PPP Password boxes

  • Change the PPP username to: "your email address used on signup"

  • Change the PPP password to: dodointernet

  • Click "Save/Apply"

B6

Your modem should now be online and connected to your nbn service.

If you are still having issues connecting to the internet you can chat our technical support team here or you can view our troubleshooting guides found here.

To use your VTPG Archer VR1600 modem, simply follow the steps below, and you should be connected to Dodo nbn in no time.

*Please note that this guide is specific to customers connected to nbn via FTTB or FTTN ONLY. You can check the technology type of your service in your Welcome email.

If you nbn is via is connected via FTTP, HFC and Fixed Wireless, click here for a suitable guide 


Step 1

Ensure that your modem is powered on and all wiring has been connected correctly


Step 2

Using a paper clip press the modem’s reset button for about 10 seconds.

The reset button is located on back of modem as shown below.

TPG1


Step 3

Next you'll need to login to your modem, using a web browser type in this IP address 192.168.1.1 and press enter.

LOGINIP


Step 4

When prompted, enter your modem login details.

TPG2


These can be found at the label at the back of your device.


Step 5

Once you have logged into your modem select "Advance" tab from the menu bar.

TPG3


Then select "Network" from the menu on the left.

TPG4


Step 6

Select "DSL" from the technology list.

TPG5


Step 7

Click the "Add" button.

TPG6


Step 8

Fill in the username and password details

  • Change the username to: "your email address used on signup"

  • Change the password to: dodointernet

TPG7


Step 9

Click "Save"

TPG8


Your modem should now be online and connected to your nbn service.

If you are still having issues connecting to the internet you can chat our technical support team here or you can view our troubleshooting guides found here.

To use your TPG Archer VR1600 modem, simply follow the steps below, and you should be connected to Dodo nbn in no time.

*Please note that this guide is specific to customers connected to nbn via FTTP, HFC and Fixed Wireless ONLY. You can check the technology type of your service in your Welcome email.

If you nbn is via is connected via FTTB or FTTN, click here for a suitable guide 

Step 1

Ensure that your modem is powered on and all wiring has been connected correctly.


Step 2

Using a paper clip press the modem’s reset button for about 10 seconds.

The reset button is located on back of modem as shown below.

TPG1


Step 3

  • Next you'll need to login to your modem, using a web browser type in this IP address 192.168.1.1 and press enter.
LOGINIP


Step 4

When prompted, enter your modem login details.

TPG2


These can be found at the label at the back of your device.


Step 5

Once you have logged into your modem select "Advance" tab from the menu bar.

TPG3


Then select "Network" from the menu on the left.

TPG4


Step 6

Select "EWAN" from the technology list.

TPG9


Step 7

Untick the VLAN ID Enable box.

TPG10


Step 8

Fill in the username and password details

  • Change the username to: "your email address used on signup"

  • Change the password to: dodointernet

TPG7


Step 9

Click "Save".

TPG8


Your modem should now be online and connected to your nbn service.

If you are still having issues connecting to the internet you can chat our technical support team here or you can view our troubleshooting guides found here.

To use your Google Wifi NSL-1304025 modem, simply follow the steps below, and you should be connected to Dodo nbn in no time.

Google Wi-Fi modem does not have a VDSL interface and is not suitable for FTTTB & FTTN services.

Step 1

Prepare your device via a quick reset

  • Disconnect the power from the device

  • Hold down the "how" button

  • Reconnect the power (while still holding down the "how" button)

  • Keep holding the "how" button for 30 seconds or until the device starts flashing blue

Step 2

Using your mobile download and open the Google Home app

Press the"+" button to begin the setup

G1


Step 3

Select "Set up device"

Then select "New device"

G2


G3


Step 4

The Google Home app will search for the Google Wi-Fi modem.

When prompted with "Would you like to set up this device?", click "Yes".

G4


Step 5

You will then be prompted to scan the QR on the bottom of your Google Wi-Fi device.

G5


Step 6

Next you'll need to scroll down to PPPoE and enter the login details

  • Enter the username to: "your email address used
    on signup"

  • Enter the password to: dodointernet

Then press "Next"

G6


Step 7

The device will the apply the WAN settings.

Then the device will check the internet connection.

G7


Step 8

Now select the modem location from the list, then click "Next"

G8


Step 9

Create a Wi-Fi name, the press "Next".

G9


Step 10

Create a Wi-Fi password, then press "Next".

G10


Step 11

Optional "Turn on Wi-Fi router and point usage stats?".

Optional "Turn on Nest Wi-Fi cloud services?

Your Wi-Fi network will now be created.

G11


Step 12

Connect your mobile device to your newly created Wi-Fi network an press "OK".

This will then complete the setup.

G12


Your modem should now be online and connected to your nbn service.

If you are still having issues connecting to the internet you can chat our technical support team here or you can view our troubleshooting guides found here.